DevelopersDocumentation
Keon WiFi Integration Guide
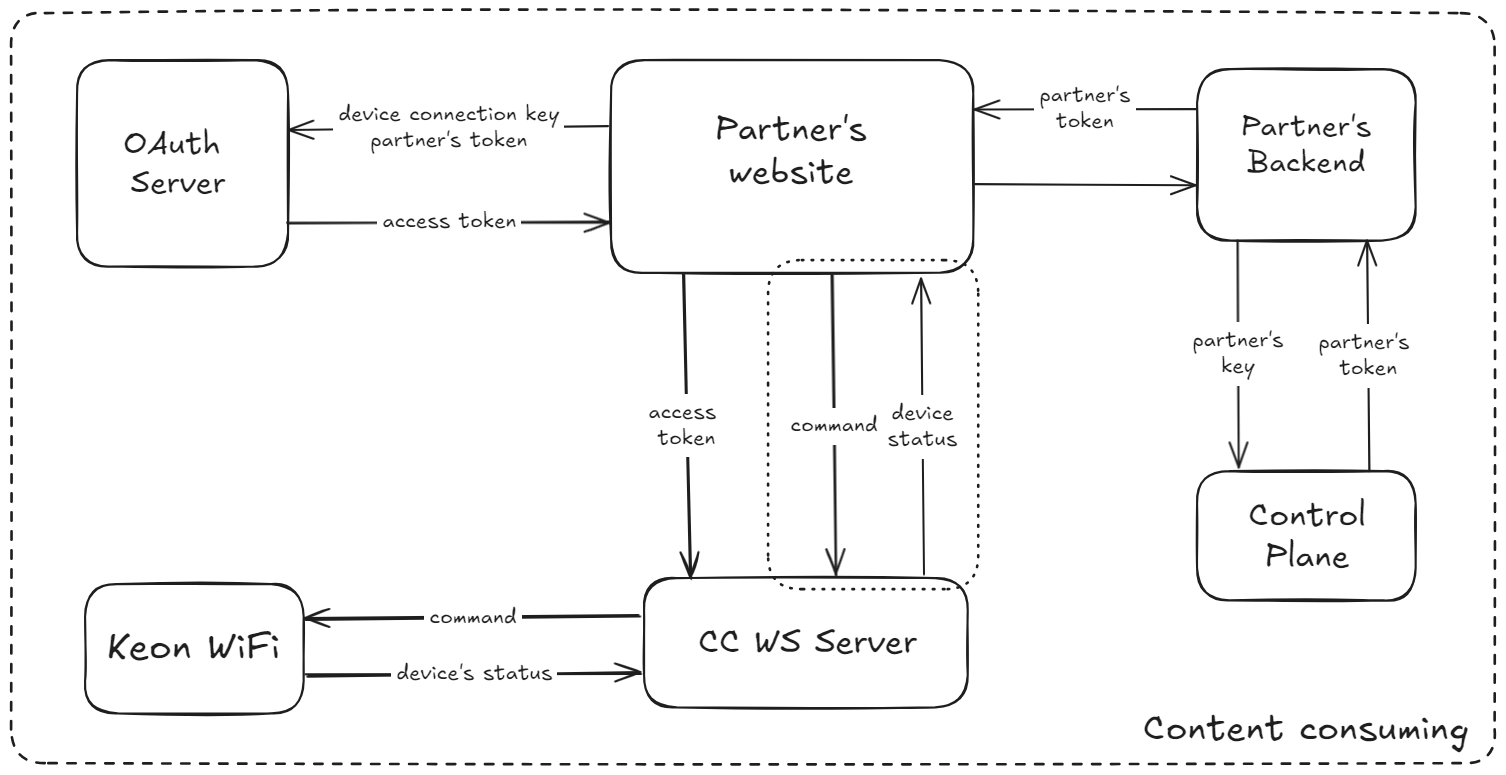
The communication with Keon WiFi devices takes place by sending messages to
the “Feelme Command Center WS Server” (CC WS Server)
via a socket.io protocol.
This is a set of servers located in different data centers. Connection to these servers is accomplished using an
Access Token.
Definitions used in the text:
- Partner website: A website that integrates with Kiiroo devices.
- Customer: A customer who has a subscription with the Partner (authenticated by the Partner).
- Backend: Software running on the Partner’s server that has a
partner-keyfrom us. - ControlPlane: A Feeltechnology server that enables integration between Kiiroo devices and the Partner: ControlPlane API.
user-id: A string, up to 100 characters long.partner-token: JSON Web Tokenpartner-key: A string, up to 1500 characters long.deviceConnectionKey: A unique, secure 8-character string consisting of digits (0-9) and letters (A-Z, a-z).- Access Token: A JSON Web Token with
{"token_type": "access"}. - OAuth Server: A server that generates and validates tokens.
- CC WS Server: Feelme Command Center Websocket Server – the communication server.
1. Step One: obtaining a partner-token.
The first step to establish communication with the device is to obtain a partner-token.
You can find the full instruction: Get Partner Token
Here is a brief summary of the process:
- The Customer logs into the Partner’s website and navigates to the device binding page.
- The Partner’s website generates a request to obtain a
partner-tokenfrom the Backend. - The Backend, using the
partner-key, requests thepartner-tokenfrom ControlPlane via the endpoint:GET ~/api/v1/partner/<partner-key>/token?user=<user-id>.
Important Notes:
- This request CANNOT be made directly from the Partner’s website, as the
partner-keyshould not be publicly exposed. user-idis a required field.partner-keyshould be passed in the ‘partner_key’ header of the request for additional security (this is the preferred method).
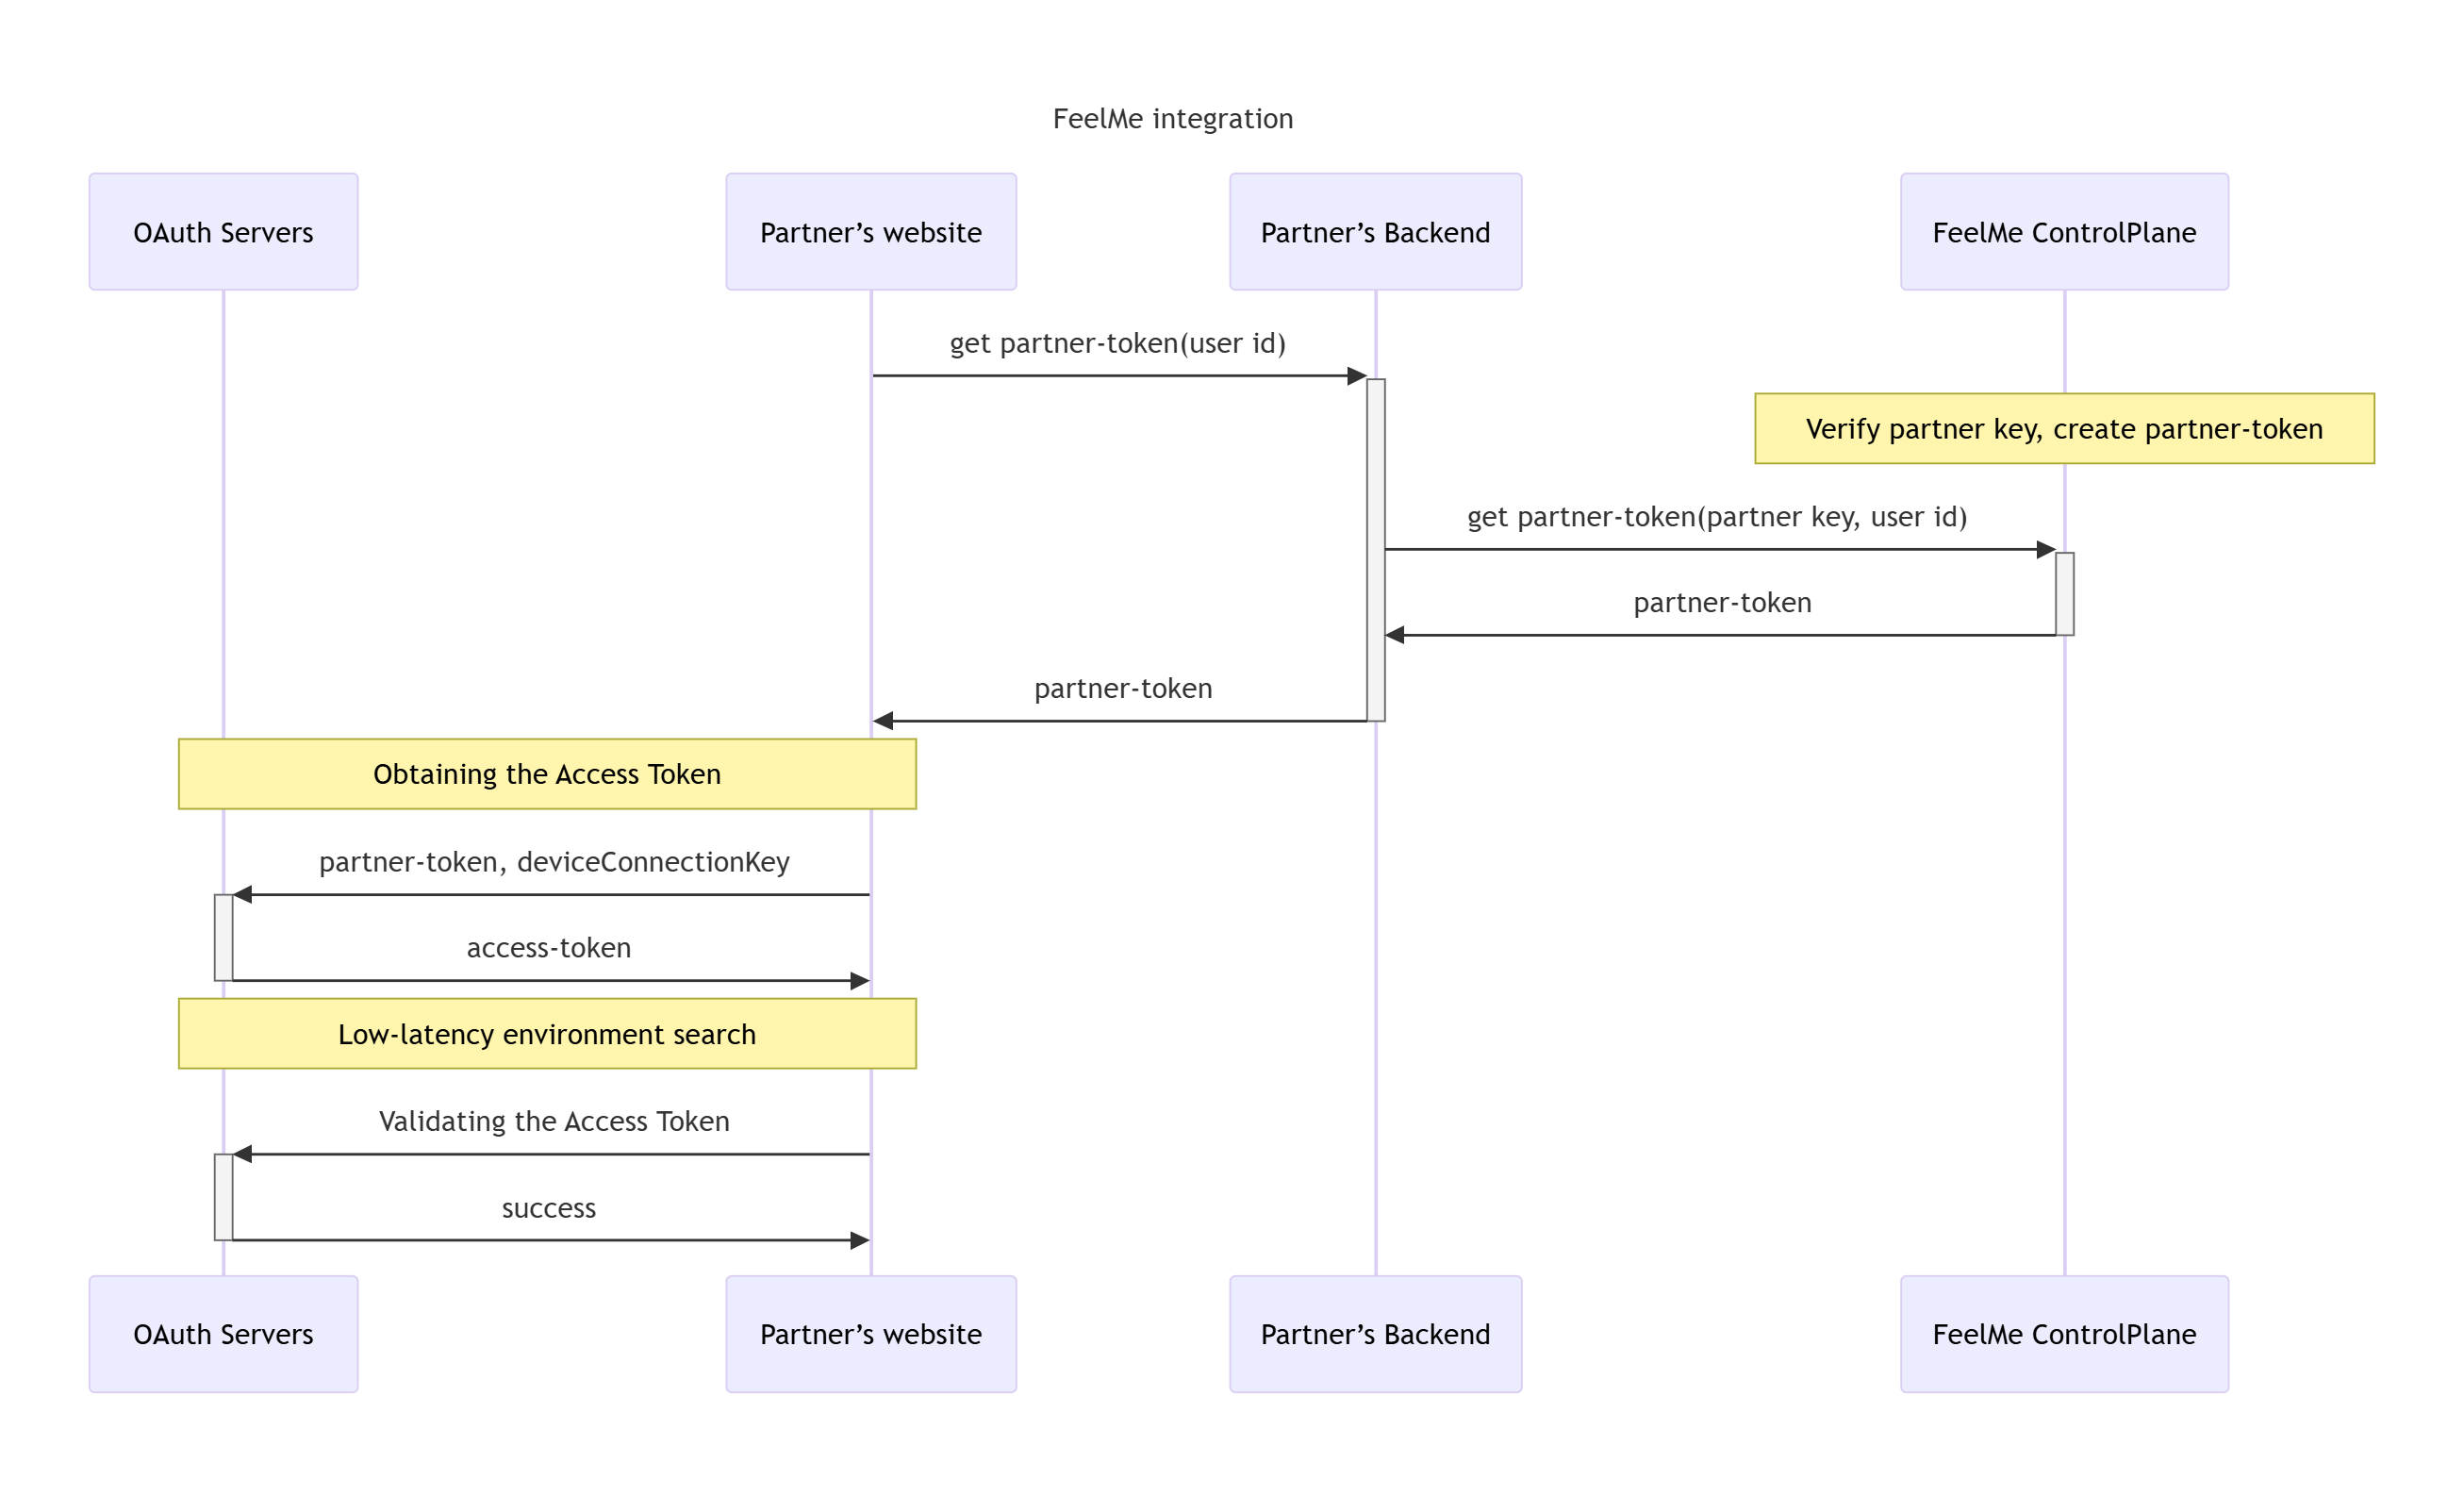
2. Step Two: choosing the nearest environment.
Once the Partner’s website receives the partner-token from the Backend, it should exchange this token for an Access
Token. Additionally, during this step, the Partner should request the deviceConnectionKey from the Customer.
There are currently three environments available in different regions:
- US:
https://oauth-us.feelme.com/api - EU:
https://oauth-eu.feelme.com/api - AUS:
https://oauth-aus.feelme.com/api
The Partner’s website should choose the nearest environment to minimize the latency between sending commands and receiving device responses. The easiest way to determine the nearest environment is by measuring the response time from each server. This needs to be done in two steps – both steps are mandatory for accurate measurements:
2.a. Obtaining the Access Token:
POST ~/api/token/partner/access
headers = {
  "Authorization" : "bearer <partner-token>"
  }

payload = {
      "data": {},
      "device_connection_key": "<deviceConnectionKey>"
    }
Response:
{
  "access_token": "eyJhbGci...",
  "refresh_token": "dGhpcyBpcyByZWZyZXNoIHpvbmU"
}
2.b. Validating the Access Token:
POST ~/api/token/validation
headers = {"Authorization" : "bearer <Access Token>"}
The quickest response time points to the right environment. The found environment must be saved (in the customer’s browser or in the database on the server, etc.) and used in the future to connect again.
Step 3 — Connect to the Command Center (socket.io server)
After obtaining an Access Token (see Step 2.a), the Partner website must establish a real-time connection to the Feelme Command Center WebSocket Server (CC WS Server) using the Socket.IO protocol. All device interactions flow through this server.
The procedure consists of two sub-steps:
3.a — Obtain a Registration Token
Issue a request to exchange your Access Token for a Registration Token:
HTTP request:
POST ~/api/token/registration
Authorization: bearer <access_token>
Successful response:
{
  "registration_token": "aW5pdGlhbF...90b2tlbg"
}
The registration_token is a Base64-encoded JWT. A decoded sample payload looks like:
{
  "user_email": "example@example.com",
  "token_type": "registration",
  "user_id": "c45993f2-5cc4-4325-ba0a-72c0f05579b8",
  "original_token_type": "access",
  "iat": 1754640029,
  "nbf": 1754640029,
  "jti": "12ae981b-d69f-4339-81ed-2a54f83cdffb",
  "exp": 1786176029,
  "data": {
    "oauth_server_url": "https://oauth-eu.feelme.com",
    "wss_cc_server_url": "https://mlserver-eu.feelme.com",
    "exchange_endpoint": "/exchange",
    "refresh_endpoint": "/refresh"
  },
  "device_connection_key": "AE2UCL06"
}
Use the data.wss_cc_server_url value to connect in the next step.
3.b — Open a socket.io connection to the CC WS Server
Create a Socket.IO client(GitHub) and pass your token in the handshake auth.
JavaScript (Browser/Node)
import { io } from "socket.io-client";

const socket = io(wss_cc_server_url, {
  // Prefer passing token in the handshake auth:
  auth: { Authorization: `Bearer ${access_token}` },

  // Optional: limit reconnect attempts
  reconnectionAttempts: 5,

  // Force WebSocket (skip long-polling) for lower latency
  transports: ["websocket"],
});

// Example: basic lifecycle
socket.on("connect", () => {
  console.log("Connected:", socket.id);
});
socket.on("connect_error", (err) => {
  console.error("Connect error:", err);
});
Python (async client):
import asyncio
import socketio

sio = socketio.AsyncClient()

async def main():
    await sio.connect(
        wss_cc_server_url,
        auth={"Authorization": f"Bearer {access_token}"},
        transports=["websocket"],   # optional, for low latency
    )
    await sio.wait()

if __name__ == "__main__":
    asyncio.run(main())
PHP (Elephant.IO client):
<?php
require 'vendor/autoload.php';

use ElephantIO\Client;

$url = $wss_cc_server_url;

// Option A: send token in headers (server reads from request headers)
$options = [
    'client'   => Client::CLIENT_4X, // Socket.IO v4
    'headers'  => [ 'Authorization' => "Bearer {$access_token}" ],
    'transport'=> 'websocket',       // optional: start with websocket
    'transports' => ['websocket'],   // optional: restrict to websocket
];

// Option B: or pass it in handshake auth (server reads socket.handshake.auth)
$options = [
    'client'   => Client::CLIENT_4X,
    'auth'     => [ 'Authorization' => "Bearer {$access_token}" ],
    'transport'=> 'websocket',
];

$client = Client::create($url, $options);
$client->connect();

// Example emit / wait
$client->emit('get_status_of_devices', []);
$packet = $client->wait('device_status'); // handle response if needed

$client->disconnect();
Once the connection is established, the website can send commands and receive device statuses. Refer to this documentation for the full set of Commands and statuses between web/mobile app and Keon WiFi